Six Ways to Create a Vignette in Photoshop

Watch Video Tutorial
Download full HD videos and tutorial project files with a PanoPass. You'll also get instant access to everything on the site, including products, and more.
A common effect people want, yet rarely know how to create, is a simple vignette. Lightroom and Adobe Camera Raw make it simple to add vignettes to your photos, but it's a little less clear in Photoshop.
This tutorial will teach you six different ways to create a simple vignette in Photoshop. Each has its pros and cons, but with some practice you'll figure out which one is best for your specific project.
Original Image
The photo we'll be working with is 1,920 x 1,080 pixels and already has a slight vignette that was created using the camera flash. We're going to enhance it using six different methods.

Method 1
Create a new layer and fill it with black. Set the Opacity to 50% in the Layers panel.
Select the Eraser tool (E), and select a soft round brush. Increase the brush size, and simply erase some of the black layer to reveal the photo underneath.
This method is one of the simplest, but not is not very editable after the fact.

Method 2
Click Layer > New Fill Layer > Solid Color. Give it a name, then choose a dark color when the color picker pops up. We're using a dark blue in this example.
Set the Opacity to 50% in the Layers panel.
Click Layer > Layer Mask > Reveal All to give it a white layer mask.
Select the Brush tool (B), and select a soft, round brush. Increase the brush size, and using black, paint on your Layer Mask to reveal the photo underneath.
This method takes a couple more steps, but now you can go back and edit your Layer Mask at any time.

Method 3
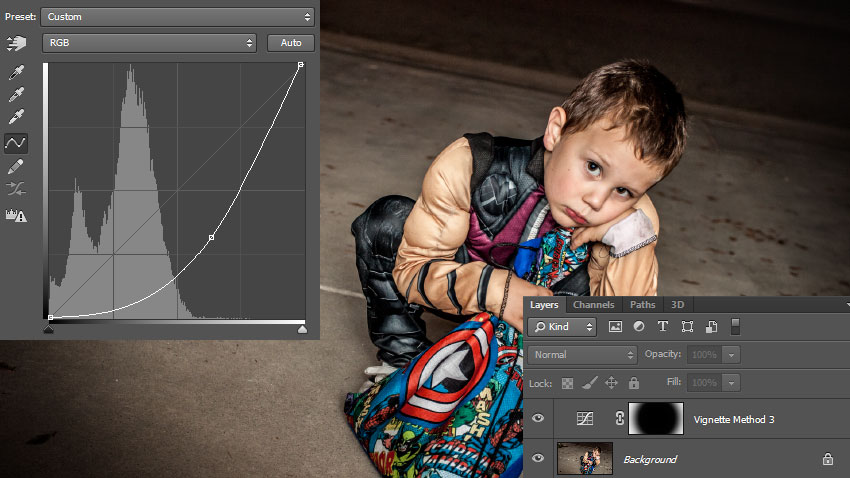
Create a Curves Adjustment Layer and drag the center of the curve down and to the right. If it doesn't already have a Layer Mask, click Layer > Layer Mask > Reveal All to give it a white Layer Mask.
Select the Brush tool (B), and select a soft, round brush. Increase the brush size, and using black, paint on your Layer Mask to limit the Curves adjustment to the outer edges of the image.
This method is quick, relatively easy, and lets you adjust the size and intensity of your vignette later on.

Method 4
Create a new layer and fill it with black. Set the Fill to 0% in the Layers panel.
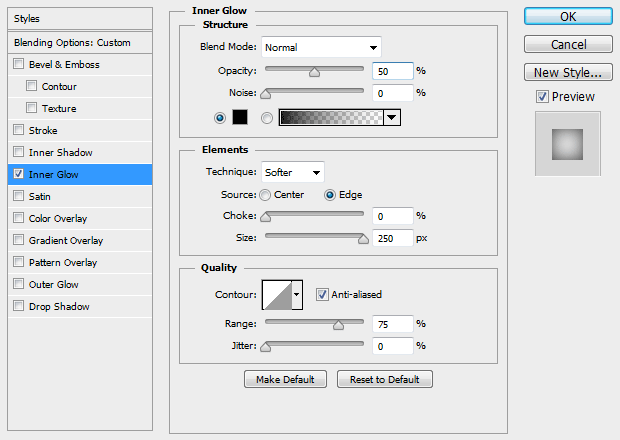
Double click the layer name in the Layers panel to open the Layer Style dialog, then turn on the Inner Glow effect.
Apply the following layer style settings, adjusting the Size to fit your particular image.
This method is limited by the size of your image, but still lets you adjust your vignette later on.


Method 5
Create a new layer and fill it with black. Set the Fill to 0% in the Layers panel.
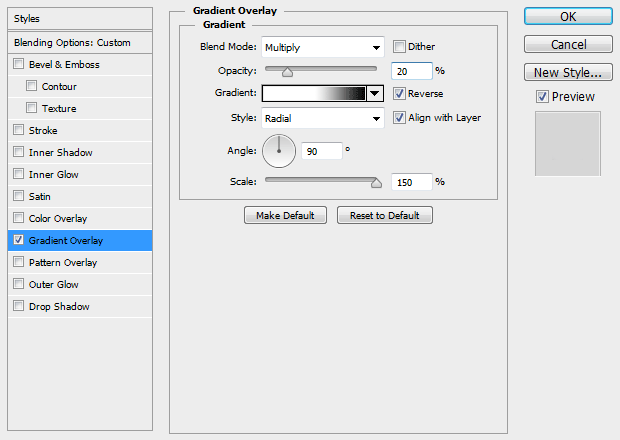
Double click the layer name in the Layers panel to open the Layer Style dialog, then turn on the Gradient Overlay effect.
Apply the following layer style settings. With the Layer Style dialog still open, you can click and drag on your canvas to move the centerpoint of your vignette.
This method is relatively easy and lets you adjust your vignette later on.


Method 6
Select the Ellipse tool (U) and make sure you have Shape selected in the top toolbar.
Click on your canvas and create an ellipse that is the same size as your image. Drag it into the center of your image.
Select the Path Selection tool (A), then click on your ellipse so it becomes selected. In the top toolbar, click the Path Operations icon, then select Subtract Front Shape. Your ellipse should become "negative" so the center area is open.

Press CTRL + T to enter Free Transform mode, then resize your ellipse (holding ALT + SHIFT to retain symmetry) so that it overlaps a bit with the edges of your canvas. Press Enter to confirm your transformation.
With your Ellipse still selected, open the Properties panel and set the Feather to 100px or so. Then set the Opacity to 50% in the Layers panel.
This method takes the longest, but is the most flexible. You can adjust the color, intensity, softness, size, shape, and position of your vignette at any time. You can even create vignettes like this using other vector shapes.

There are a LOT of different ways to create a vignette in Photoshop, but this tutorial should expand your creativity and help you see how you can use different tools to achieve similar results.

Do you have another vignette method that you prefer? Which one is your favorite?
